We shape clay into a pot, but it is the emptiness inside that holds whatever we want.”
Tao Saying
Working with clay is something really special. Our school has a kiln, and we use real clay. The smell alone is a deeply sensory experience. There is nothing like breaking open a new package of clay.
If you don’t have a kiln to fire real clay at your school you can use modeling clay as well. It still will be a great learning experience for your kids.
We also like to discuss where clay comes from. There are lots of youtube videos of people extracting clay right from the ground.
Clay has to be used quickly. Our clay comes in large blocks. We cut the clay with a string and students work right on their desks. Every student has a small cup of water ready in case their clay gets too dry.
Clay has to be used quickly. Our clay comes in large blocks. We cut the clay with a string and students work right on their desks. Every student has a small cup of water ready in case their clay gets too dry.
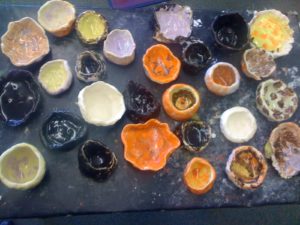
We demonstrate how to knead clay and form a sphere. The trick is to “pinch” your thumbs into the clay to form a small pot. Students smooth the edges of the pots, by moistening their fingers with a little bit of water. Most students have used playdough before, but clay is a very different material. It is hard to knead and has to be moist at all times.
After the lesson, we stash the pinch pots on top of a closet and forget about them for a long time. It is very important that they dry sufficiently or the clay will explode in the kiln. The thicker the objects, the more time they need to dry. We usually wait four weeks before firing them.
The first round of firing in the kiln, also known as the bisque firing, comes first. Every kiln is different and it is best to read the manual to determine individual firing times. If you are using modeling clay you get to skip the firing process.
Last but not least, we glaze our pots. We use non-toxic lead-free paint and the colors are barely visible during the painting process. We tell the kids the paint works like magic and turns into glass during the second firing process. Firing the glaze is very time consuming because the objects cannot be stacked or touch each other at all.
Finally, the pots are ready to go home. We usually wrap them in clear cellophane so the kids won’t break them. They look very cute filled with candies and make excellent Holiday gifts!
Are you interested in more art projects? Click right here for more (Almost) No Prep Art.


